In this article, I am going to show you how to use the JSON configuration format to build the Ansible inventory files. So, let's get started.
Prerequisites:
If you want to try out the examples of this article,
1) You must have Ansible installed on your computer.
2) You must have at least 6 Linux hosts configured for Ansible automation.
There are many articles on LinuxHint dedicated to Installing Ansible and configuring hosts for Ansible automation. You may check them out if needed.
Creating a Project Directory:
In this article, I am going to use the Visual Studio Code for editing the Ansible configuration file, inventory file, and playbooks. You can use any editor or IDE you want.
Before you get started, let's create a project directory so that we can organize our project files.
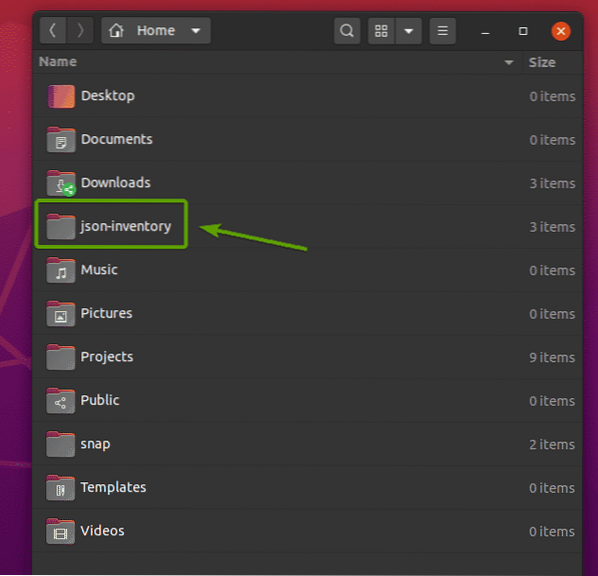
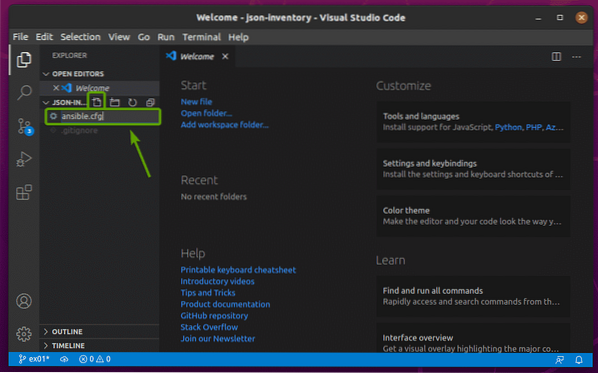
I have created a new project directory json-inventory/ in my HOME directory as you can see in the screenshot below.
Once you have created a new project directory, open it with your favorite text editor or IDE.
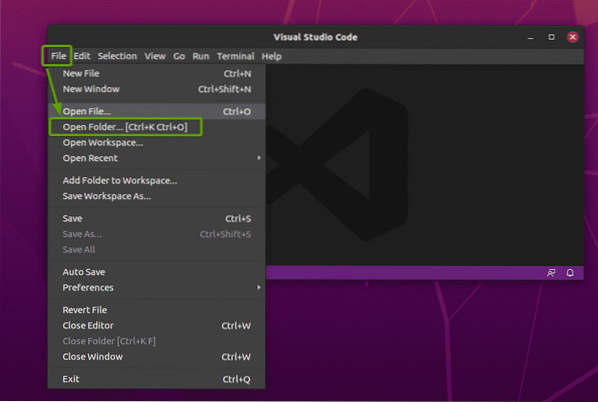
In Visual Studio Code, go to File > Open Folder… as marked in the screenshot below.
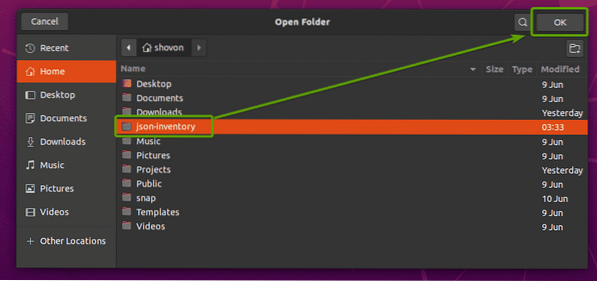
Now, select the project directory json-inventory/ and click on OK.
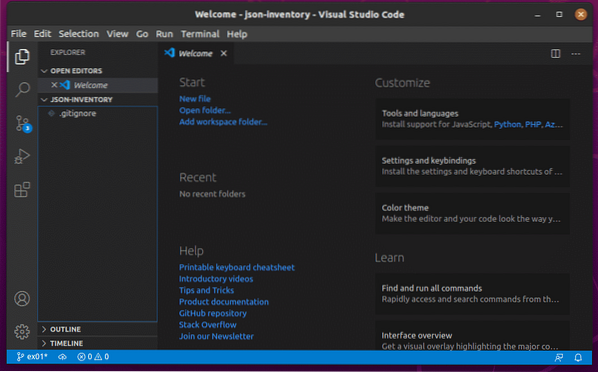
The project directory should be opened with Visual Studio Code.
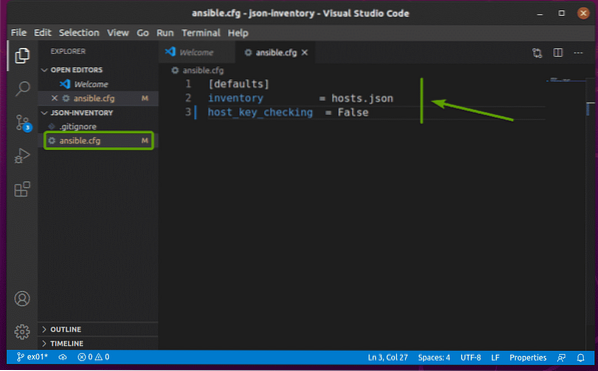
Now, click on New File and create a new file ansible.cfg.
Then, type in the following lines in the ansible.cfg file.
[defaults]inventory = hosts.json
host_key_checking = False
Once you're done, press
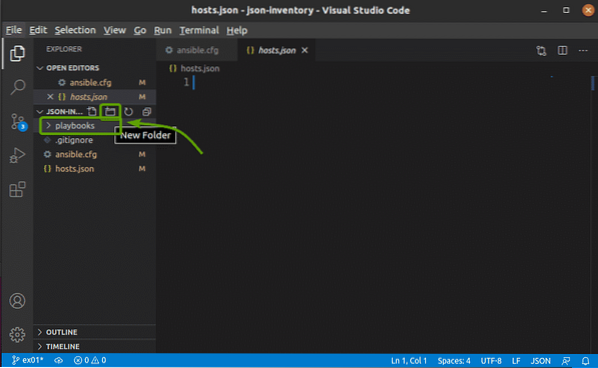
The same way, create a hosts.json file. This is the JSON inventory file. Leave it blank for now. We will work on it later.

Now, click on New Folder and create a new directory playbooks as shown in the screenshot below.
Adding Hosts to the JSON Inventory File:
In this section, I am going to show you how to add hosts to your inventory file in JSON format.
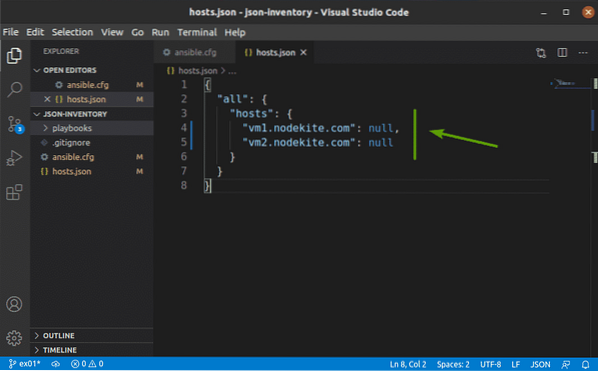
In the hosts.json inventory file, you add an all section.
"all":
In all section, you add a host section and add your hosts.
"all":
"hosts":
"host1": null,
"host2": null
For example, you can add the hosts vm1.nodekite.com and vm2.nodekite.com in the hosts.json inventory file as follows.
"all":
"hosts":
"vm1.nodekite.com": null,
"vm2.nodekite.com": null
Once you're done, press
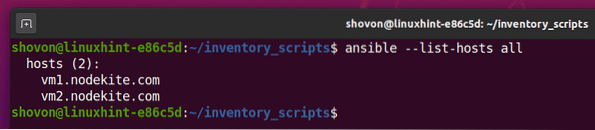
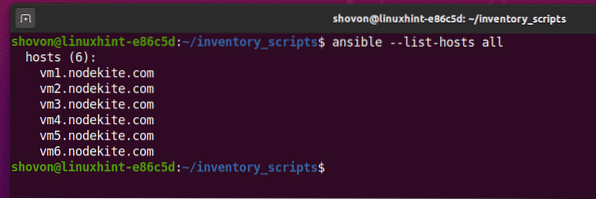
You can check which hosts are available in your inventory file with the following command:
$ ansible --list-hosts all
As you can see, the hosts I have added in my inventory file (vm1.nodekite.com and vm2.nodekite.com) are listed.
Grouping Hosts in the JSON Inventory File:
In this section, I am going to show you how to group hosts in your JSON inventory file.
The default host group in Ansible is all. The all group has all the hosts from every group (including the hosts from all group).
You add host groups in the children section of your JSON inventory file.
"all":
…
"children":
"group1":
,
"group2":
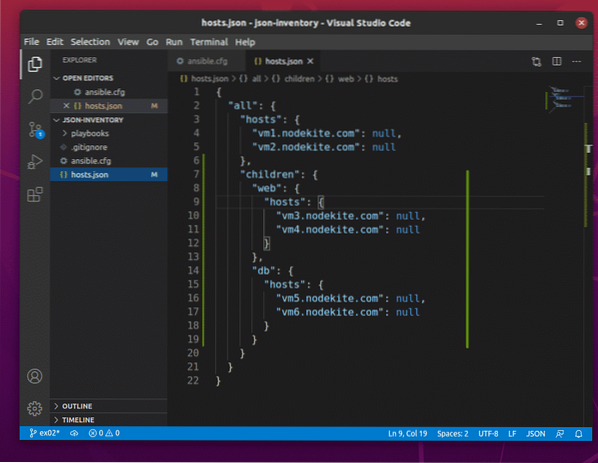
For example, to add the hosts vm3.nodekite.com and vm4.nodekite.com in the web group, and to add the hosts vm5.nodekite.com and vm6.nodekite.com in the db group, type in the following lines in your JSON inventory file.
"all":
"hosts":
"vm1.nodekite.com": null,
"vm2.nodekite.com": null
,
"children":
"web":
"hosts":
"vm3.nodekite.com": null,
"vm4.nodekite.com": null
,
"db":
"hosts":
"vm5.nodekite.com": null,
"vm6.nodekite.com": null
Once you're done, press
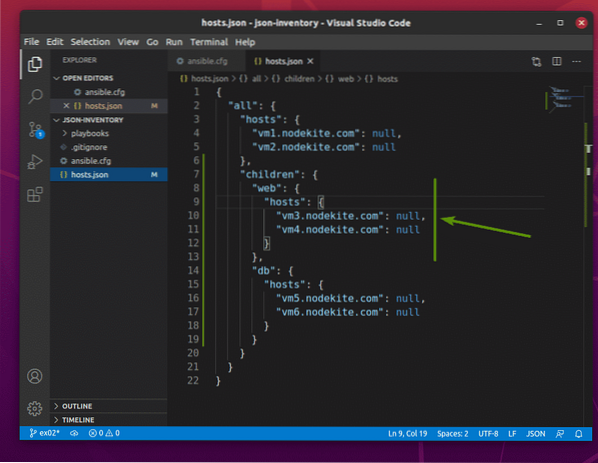
Here, the marked lines add the hosts vm3.nodekite.com and vm4.nodekite.com in the web group.
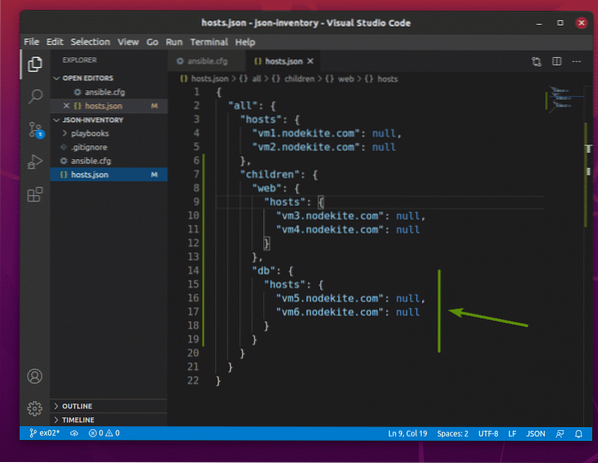
The marked lines add the hosts vm5.nodekite.com and vm6.nodekite.com in the db group.
Now, you can list all the available hosts in your JSON inventory file with the following command:
$ ansible --list-hosts all
As you can see, all the hosts from every group (web, db, and all) are displayed.
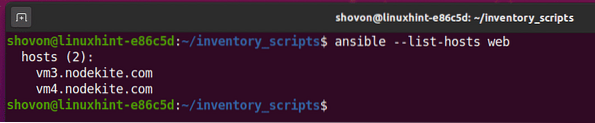
To list the available hosts from the web group only, run the following command:
$ ansible --list-hosts web
As you can see, all the hosts in the web group are displayed.
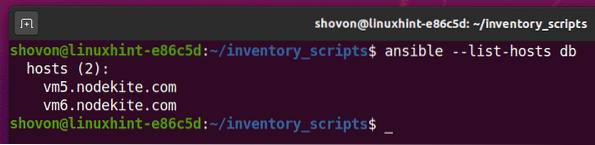
The same way, you can list all the available hosts from the db group with the following command:
$ ansible --list-hosts db
As you can see, all the hosts in the db group are displayed.
Adding Global Facts in the JSON Inventory File:
In Ansible, variables are also called facts. Global facts or global variables are accessible from every host of every group in your JSON inventory file. In this section, I am going to show you how to add global facts or global variables in ansible.
You can add global facts or global variables in the vars section inside all section of your JSON inventory file as follows:
"all":
"hosts":
…
,
"vars":
"variable1": "value1",
"variable2": "value2"
,
"children":
"web":
…
,
"db":
…
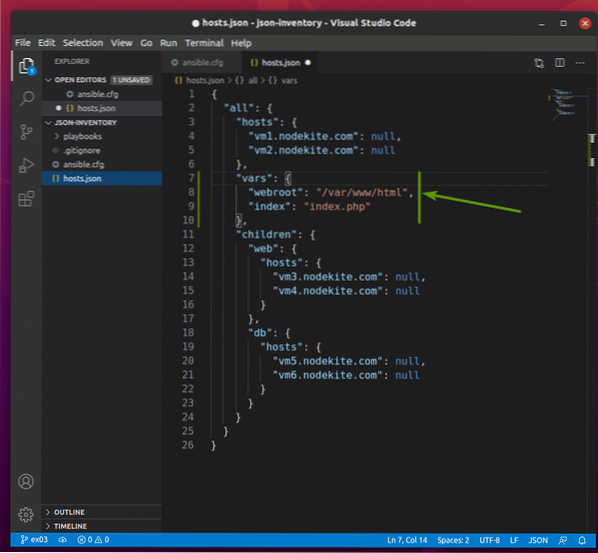
For example, you can add the global facts/variables webroot and index in the vars section of your JSON inventory file as follows:
"all":
"hosts":
"vm1.nodekite.com": null,
"vm2.nodekite.com": null
,
"vars":
"webroot": "/var/www/html",
"index": "index.php"
,
"children":
"web":
"hosts":
"vm3.nodekite.com": null,
"vm4.nodekite.com": null
,
"db":
"hosts":
"vm5.nodekite.com": null,
"vm6.nodekite.com": null
Once you're done, press
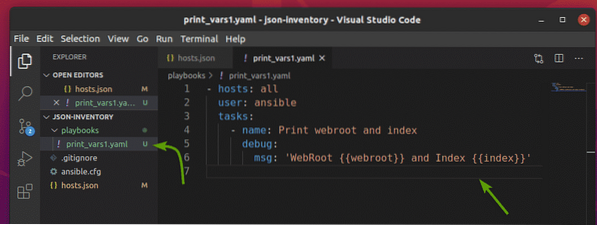
To check whether the global facts/variables are working, I am going to create a new playbook print_vars1.yaml. The purpose of this playbook is to print the facts/variables using the debug module of Ansible. It will also help us understand fact/variable precedence later.
So, create a new playbook print_vars1.yaml in your playbooks/ directory and type in the following lines in your print_vars1.yaml file.
- hosts: alluser: ansible
tasks:
- name: Print webroot and index
debug:
msg: 'WebRoot webroot and Index index'
Once you're done, press
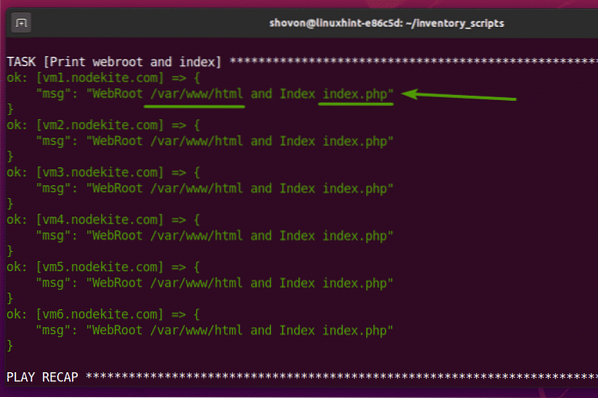
To check whether the global facts/variables are working, run the print_vars1.yaml playbook as follows:
$ ansible-playbook playbooks/print_vars1.yaml
The playbook should run successfully.
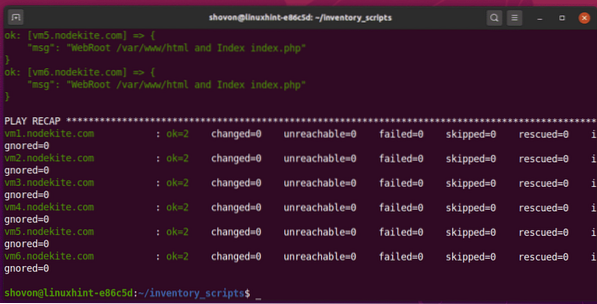
Scroll back to the TASK section. As you can see, the webroot and index facts/variables are applied to every host in my JSON inventory file. So, global facts/variables are working.
Adding Group Facts in the JSON Inventory File:
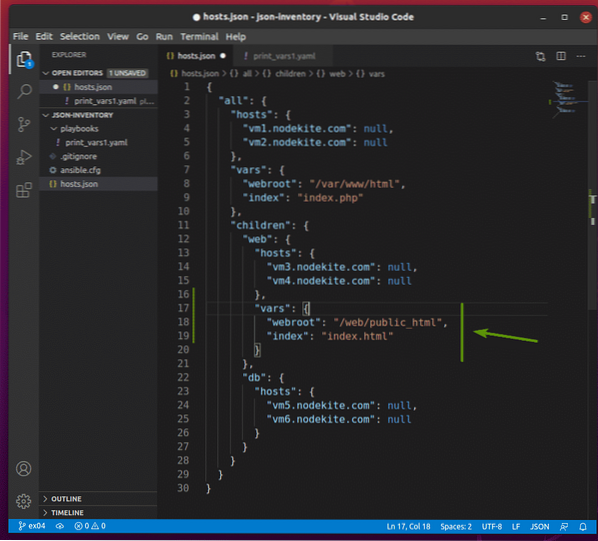
You can add facts/variables for a specific host group as well. In this section, I am going to show you how to add group facts/variables in your JSON inventory file.
I am going to add the same webroot and index facts in the web host group of my JSON inventory file. The value of these facts will be different. I have done it so that you can also understand how facts/variable precedence works in Ansible.
To add the facts webroot and index in the web host group, add a vars section in the web section of your JSON inventory file as follows:
"all":
"hosts":
"vm1.nodekite.com": null,
"vm2.nodekite.com": null
,
"vars":
"webroot": "/var/www/html",
"index": "index.php"
,
"children":
"web":
"hosts":
"vm3.nodekite.com": null,
"vm4.nodekite.com": null
,
"vars":
"webroot": "/web/public_html",
"index": "index.html"
,
"db":
"hosts":
"vm5.nodekite.com": null,
"vm6.nodekite.com": null
Once you're done, press
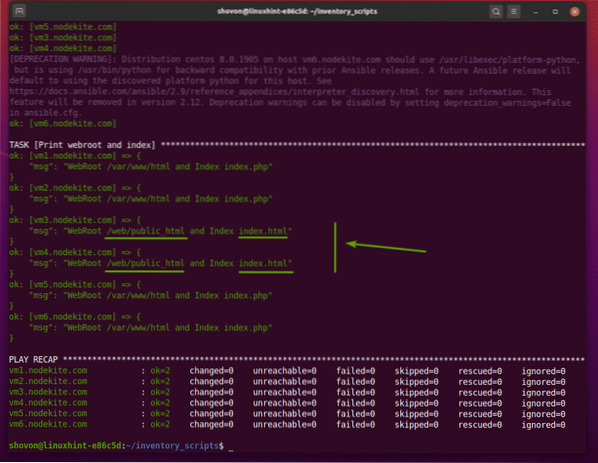
To check the facts,run the print_vars1.yaml playbook as follows:
$ ansible-playbook playbooks/print_vars1.yaml
As you can see, the group facts webroot and index are available only for the hosts vm3.nodekite.com and vm4.nodekite.com, the hosts in the web group.
Also, notice that the group facts (webroot and index) replaced the global facts (webroot and index). So, you can say that the group facts has higher precedence than the global facts.
Adding Host Facts in the JSON Inventory File:
You can add host-specific facts/variables in your JSON inventory file as well. In this section, I am going to show you how to add host-specific facts/variables in your JSON inventory file.
For global or group facts, we have kept the value of the hosts null.

To add host facts, replace null with your host facts in the JSON inventory file as follows:
"hosts":"host1":
"var1": "value1",
"var2": "value2",
,
"host2":
"var2": "value3",
"var3": "value4",
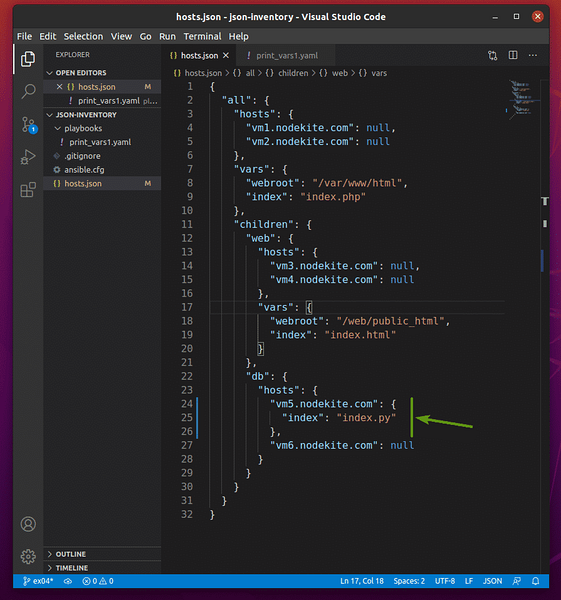
For example, to add the index host fact to the vm5.nodekite.com host, replace null with the host facts as follows.
"all":
"hosts":
"vm1.nodekite.com": null,
"vm2.nodekite.com": null
,
"vars":
"webroot": "/var/www/html",
"index": "index.php"
,
"children":
"web":
"hosts":
"vm3.nodekite.com": null,
"vm4.nodekite.com": null
,
"vars":
"webroot": "/web/public_html",
"index": "index.html"
,
"db":
"hosts":
"vm5.nodekite.com":
"index": "index.py"
,
"vm6.nodekite.com": null
Once you're done, press
To check the available facts, run the print_vars1.yaml playbook as follows:
$ ansible-playbook playbooks/print_vars1.yaml
As you can see, the index fact is available only for the vm5.nodekite.com host.
Also notice that the host fact replaced the global fact. The host facts/variables have the highest precedence in Ansible. So, the host facts/variables will replace the group facts/variables and global facts/variables.

Conclusion:
In this article, I have shown you how to build an Ansible inventory file in JSON format. I have shown you how to add hosts, add host groups, add global facts, add group facts, and add host facts in your inventory file in JSON format.


