If you want to turn off or hide Windows Spotlight notifications in Action Center, this article will be helpful for you. It is possible to disable all these notifications with the help of the Local Group Policy Editor or Registry Editor.
When you install Windows 10 for the very first time, it shows various notifications and suggestions in the Start Menu as well as Action Center. Although Windows Settings lets you remove app suggestions from the Start menu, it doesn't block Action Center notifications. At times, it is essential to clear the unnecessary list of notifications to make space for an important one. If so, you can disable all the Windows Spotlight related notifications with this tutorial.
Hide Windows Spotlight notifications in Action Center
Using Local Group Policy Editor
To hide Windows Spotlight notifications in Action Center, follow these steps-
- Press Win+R to open the Run prompt.
- Type gpedit.msc and hit the Enter button.
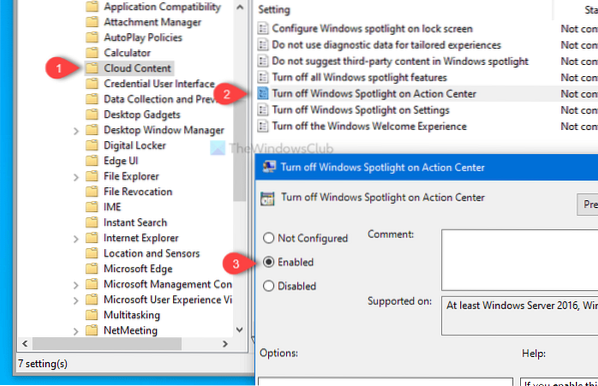
- Navigate to Cloud Content in User Configuration.
- Double-click on Turn off Windows Spotlight on Action Center.
- Select Enabled.
- Click on Apply and OK.
To know more, keep reading.
At first, you will open the Local Group Policy Editor. For that, press Win+R to open the Run prompt, type gpedit.msc, and hit the Enter button. After opening the Local Group Policy Editor, navigate to this path-
User Configuration > Administrative Templates > Windows Components > Cloud Content
On the right-hand side, you will see a setting called Turn off Windows Spotlight on Action Center. Double-click on it, and select the Enabled option.
Following that, click on the Apply and OK buttons respectively to save changes.
Using Registry Editor

To hide Windows Spotlight notifications in Action Center using Registry Editor, follow these steps-
- Search for regedit in the Taskbar search box.
- Click on Registry Editor in the search result.
- Click the Yes button in the UAC prompt.
- Navigate to Cloud Content in the HKEY_CURRENT_USER.
- Right-click on Cloud Content > New > DWORD (32-bit) Value.
- Name it as DisableWindowsSpotlightOnActionCenter.
- Set the Value data as 1.
- Click OK to save.
Let's check out these steps in detail.
To get started, search for regedit in the Taskbar search box, and click the Registry Editor in the search result. Following that, you will see the UAC prompt where you need to click the Yes button. Once the Registry Editor is opened, navigate to this path-
HKEY_CURRENT_USER\SOFTWARE\Policies\Microsoft\Windows\CloudContent
Right-click on CloudContent, select New > DWORD (32-bit) Value, and name it as DisableWindowsSpotlightOnActionCenter.
Double-click on it to set the Value data as 1, and click the OK button to save the change.
That's all! Hope it helps.


