The Start Menu was the most anticipated feature introduced again in Windows 10 update. The Windows 10 Start Menu is very adaptive and customizable, but what if you want to fix a particular Start Menu layout for you as well as for other users of the computer. This post discusses the method to export, import and fix a particular Start Menu layout on Windows 10. Fixing a layout comes with a lot of benefits, it assures uniformity and can also prevent anyone from distorting your fixed Start Menu layout.
Export a Start Menu layout
The steps to be followed for exporting a layout in XML file format is similar to what it is in Windows 8.1.
Open the 'System32' folder located in 'Windows' directory. Now click on 'File', then click on 'Open Windows PowerShell as Administrator'.
To export, you need to run the following commands for exporting the Start Menu layout:
export-startlayout -path.xml
example:
export-startlayout -path C:\layout.xml
The layout will be exported to an XML file and will be saved at the specified path.
We will use this file again while importing this start menu layout so that you may preserve the file for future use.
Import a Start Menu Layout
To import the customized layout into the system, run the following command in an elevated PowerShell window:
Import-StartLayout -LayoutPath.xml -MountPath %systemdrive%
You can import a Start Menu layout using Group Policy Editor (gpedit). After importing the layout it will be fixed, that is you will not be able to change that layout by moving the tiles around. But you can easily undo changes and again make the Start Menu customizable by following the steps given below.
To apply the Start layout to users in a domain, create a Group Policy Object. Press 'Win + R' on your keyboard and then type 'gpedit' and hit enter.
Once the Group Policy Editor is up and running, navigate to 'User Configuration' then to 'Administrative Templates' and then to 'Start Menu and Taskbar'.
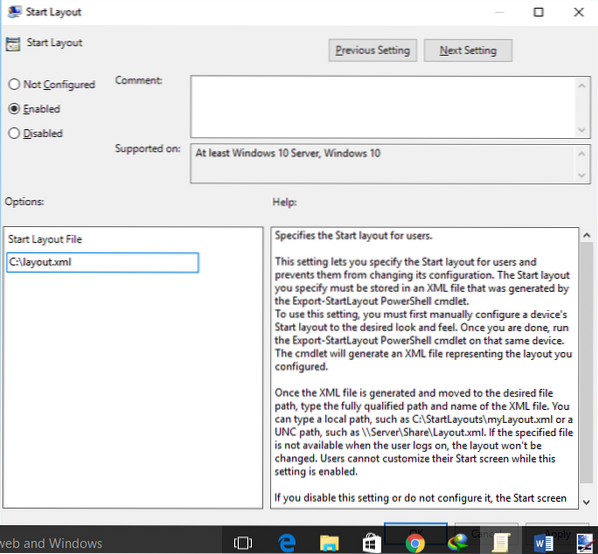
Now locate 'Start Layout' in the right pane and open the setting.
Click on 'Enable' radio button and then in Start Layout File textbox, type in the path to file that we've exported earlier. (C:\layout.xml)
Click 'Apply' and close everything. Sign Out of your account and then Sign In again.
Now you will not be able to edit start menu layout as it will be fixed and will not allow any changes. You can make the start menu editable once again by disabling the 'Start Layout' setting that we've enabled in Step 4.
To apply these changes to all users on a computer, you need to repeat all the steps but in Step 2, navigate to 'Computer Configuration' instead of 'User Configuration'.
If you want to update the fixed Start Menu layout, you just need to update the XML file that we exported earlier. You can replace it with another XML file but make sure the file name and path remains the same.
TIP: You can also Backup Start Menu Layout using this free software.
If you have any questions or if you are not able to understand any of the steps, feel free to comment down below. You might also want to learn how to Backup, Restore, Reset Start Menu layout in Windows 10.


