NOTE: In this tutorial, we use Linux Mint 20 to implement useradd, but you can use a different Linux distribution.
Example 1: Adding a new user in Linux
If you want to create a new user on your Linux operating system with sudo privileges, the following steps must be taken:
First, open a terminal on your Linux machine by clicking the terminal icon on the taskbar. Once the terminal window loads, type the following command:
$ sudo adduser [user_name]If you want to create a new user named “raza”, for example, then replace [user_name] with raza.
$ sudo adduser raza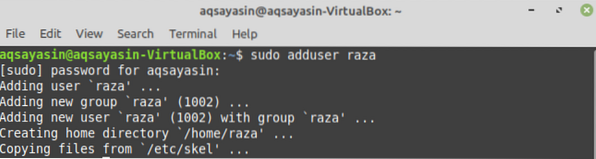
This command will create a new user named raza in the Linux operating system.
When a new user is created in Linux, an entry is generated in '/etc file'. This file stores information about the user. To set a password for a new user, execute the following command.
You have to type a new password for the user because, when a user is created, it is locked by default. Then, retype the new password.

After this step is completed, the user information will have been updated in Linux, and a message proclaiming the success of the update will be displayed on the terminal.
Example 2: Adding a user with a specified User ID
Every user in Linux has its own unique identification number (UID), but you can use the -u flag along with the useradd command to create a user with a specific user ID. In this example, we will create a user named “SRaza” with a unique id of 1200. To do so, we enter the following command in the terminal:
$ sudo useradd -u 1200 SRaza
By executing this command, our new user has been created. If you want to confirm the successful execution of this command, you can type the following command in the terminal:
$ id -u SRaza
Example 3: Adding a user with a home directory
To add a user with a home directory, you have to use the -m flag with useradd command. Without the -m flag, no home directory will be created in Linux. In this example, our goal is to create a new user named “alpha” with a home directory. To do so, we use the following command:
$ sudo useradd -m alphaTo confirm the home directory of the newly created user, enter the following command in the terminal:
$ ls -a /home/alpha
Example 4: Adding a user without a home directory
To create a user without a home directory, use the -M flag with the useradd command. We want to create a new user named “Noor” without a home directory. To do so, we enter the following command in the terminal:
$ sudo useradd -M NoorYou can set the password for the new user by typing the following command:
$ sudo passwd NoorNext, you enter the new password for the user, and then retype the password. After this step is completed, the user information will have been updated in Linux, and a message proclaiming the success of the update will be displayed on the terminal.

Example 5: Creating a user with an expiry date
If you want to create a new user and to fix the expiry date of the user, you can use the -e flag along with the useradd command. In this example, we want to create a user named “Ali” with an expiry date of October 12, 2021. To do so, we enter the following command:
$ useradd -e 2021-10-12 Ali
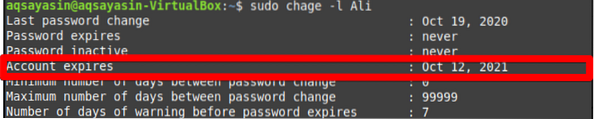
If you want to verify that the expiry date has been fixed, type the following command:
$ sudo chage -l AliThis command will show the expiry date of the user account on the terminal. In our case, the date is “Oct 12, 2021”, which matches the date from the above command.
Example 6: Creating a user with a description
If you want to create a new user with a small description or comment, you can do so with the help of the -c flag. In this example, we want to create a user named “ayesha” with the description “HI AYESHA”. To do so, we type the following command in our terminal.
$ sudo useradd -c “HI AYESHA” ayeshaTo verify that the comment has been added, you can use the following command :
$ sudo cat /etc/passwd | grep ayeshaAs shown below, the user 'ayesha' has been added along with the description.

Conclusion:
In this article, we worked through several examples with the useradd command in Linux Mint 20. You can create users as shown above by following along with these examples. There are several more advanced use cases for the useradd command in Linux, but this introduction should be enough to get you started with the command.


