Prerequisites:
The users have to know the way of running the command from the terminal and the basic knowledge of creating files and folders in the Linux operating system to run and understand the commands used in this article.
Content of this article:
The following concept and tasks related to the file permission and ownership are covered in this article.
- Types of Users
- Permission Types
- Check Permissions
- Change permission using chmod
- Change ownership using chown
Types of Users:
Three types of users exist in the Linux operating system, which is mentioned below.
Owner:
The user who creates the file or folder is the owner of that file or folder, and the owner can permit the other types of users to access that file and folder. It is denoted by 'u'.
Group:
Each user can belong to a particular group in Linux. So, when a user creates a file or folder, then other members of the group where the user belongs can access the file or folder. When multiple users work on a particular folder, then it is better to create a group with those users to access that folder properly. It is denoted by 'g'.
Others/All:
It indicates any user who is not the owner of a particular file or folder and does not belong to the file or folder owner's group. If the owner of the file or folder gives any access permission to others, then any users can do that particular access only. 'o' is used to denote other users, and 'a' is used to denote all users.
Permission Types:
Three permission types exist in the Linux system, which is mentioned below.
Read:
This permission is used to read any file or folder only. It is denoted by 'r' when it is defined by character, and it is denoted by 4 when it is defined by a number.
Write:
This permission is used to write, append, or override any file or folder. It is denoted by 'w' when it is defined by the character, and it is denoted by 2 when it is defined by the number. If the user has to write permission to a file, but he/she has not to write permission on the folder where the file is located, then the user can modify the content of the file only, but he/she will not able to rename, move or delete the file.
Execute:
This permission is used to execute any file only. It is denoted by 'x' when it is defined by the character, and it is denoted by 1 when it is defined by the number.
Check Permissions:
Run the following command to check the permissions of all files and fodders of the current directory.
$ ls -lThe output shows seven columns. The first column displays the permissions of the particular file and folders. The first column has four parts that contain 10 bits. The first part contains 1 bit that indicates the file or folder or symbolic link. The folder is indicated by the character 'd', the file is indicated by '-' and the link is indicated by the character 'l'. The second part contains 3 bits that contain the permission bits for the owner of the file or folder. The third part contains 3 bits that contain the permission bits for the group users. The fourth part contains 3 bits that contain permission bits for other users. The permission bits of the current directory list will look like the first column of the following image.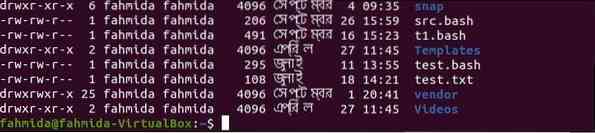
According to the above permission bits, the first bit indicates that it shows the permissions of a file. The next three bits indicate that the owner of the file has read, write, and access permissions. The next three bits indicate that the group users have read and write permissions. The last three bits indicate that other users can read the file only. How the default permission bits can be changed by using different Linux commands are shown in the next part of the article.
Change permission using chmod:
chmod command is used to change the permission bits of the file or folder. The full form of this command is to change file mode. The owner of the file and the root user can change the permission bits of the file and folder. Any permission for any user can be given and revoked for the file and folder by using chmod.
Syntax:
chmod [Permission][Path of file or folder]
The permission bits can be defined by explicitly and binary references, which are explained in the next part of this tutorial.
Set permissions in symbolic mode:
'u', 'g', and 'o' characters are used for user types, and 'r', 'w', and 'x' characters are used for permission types in symbolic mode. How the permission can be set for file and folder are shown in the next part of the tutorial. The following table shows the list of mathematical symbols that are used to set, reset, and remove permission bits for the file or folder.
| Operator | Purpose |
| + | It is used to add or assign the permissions for the particular file or folder. |
| = | It is used to reassign the permissions for the particular file or folder. |
| - | It is used to remove the permissions from the particular file or folder. |
File Permissions:
Some examples of add and remove permission bits of the file are shown in the following examples. Run the following commands to check the current permission bits of the particular directory path, /projects/bin/ that exists in the system. This command returns the long list of files and folders in reverse order with the permission bits.
$ ls -lrThe output shows that the projects/bin directory contains two folders and seven files.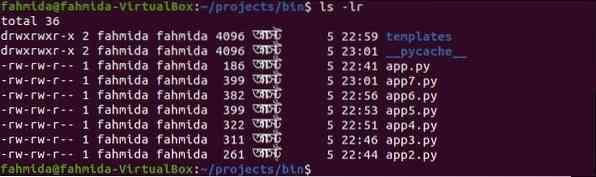
Example-1: Set execute permission for the owner of a file
Run the following commands to set the execute(x) permission bit for the owner(u) of the file, app.py, and check the permission bits again after running the chmod command.
$ chmod u+x app.py$ ls -lr
The following output shows that the permission bits for app.py are changed to
- r w x r w - r - -. The execute(x) permission is assigned to the owner.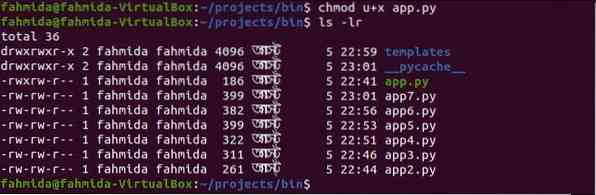
Example-2: Set write and execute permission for any user of a file
Run the following command to set write(w) and execute(x) permissions for all users for the file app2.py and check the permission bits again after running the chmod command.
$ chmod a+wx app2.py$ ls -lr
The following output shows that the permission bits for app2.py are changed to
- r w x r w x r w x. The write(r) and execute(x) permissions are assigned for any user for this file.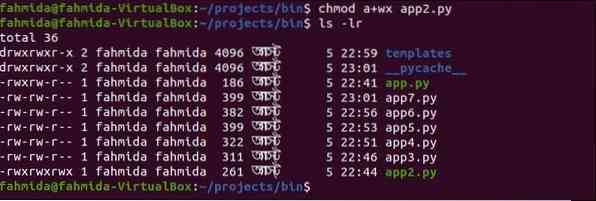
Example-3: Reset permission for group users of a file
Run the following command to reset permissions for group users for the file app3.py and check the permission bits again after running the chmod command. Here, the execute(x) permission bit will be set only for the group users, and read(r) and write(r) permissions will be revoked.
$ chmod g=x app3.py$ ls -lr
The following output shows that the permission bits for app3.py are changed to
- r w - - - x r - -. The execute(x) permission is assigned only for the group users.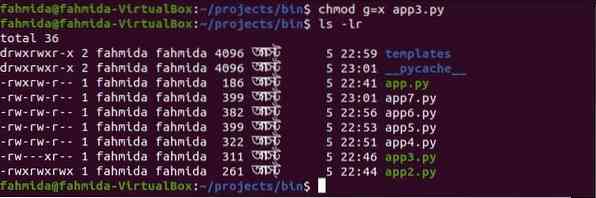
Example-4: Read permission is revoked from others
Run the following command to remove read(r) permission bit for others for the file app4.py and check the permission bits again after running the chmod command.
$ chmod o-r app4.py$ ls -lr
The following output shows that the permission bits for app4.py are changed to
- r w - r w - - - -. The read(r) permission is revoked for the others.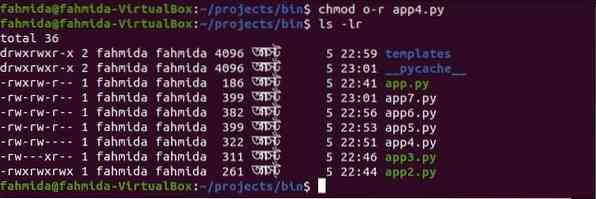
Folder Permissions:
The permission bits can be set, reset, and remove for the folder like the files that are shown in the above chmod commands.
Example-5: Set, reset and revoke permission for the folder
Run the following commands to set write(x) permission for others, reset permission for group users by assigning read(r) permission only and remove execute(x) permission for the owner of the folder, templates.
$ chmod o+x templates$ chmod g=r templates
$ chmod u-x templates
$ ls -lr
The following output shows that the permission bits for the templates folder are changed to d r w - r - - r - x. The execute(x) permission is set for others, read(r) permission is reset for group users and execute(x) permission is revoked for the owner.
Set permissions in numeric mode:
The permission bits of file and folder are set or reset by using a three-digit octal number. In the symbolic mode, one or more permission bits can be set or reset or remove for a particular user type only. In numeric mode, the permission bits for all three types of users are changed by a single command. The following table shows different permission types that are defined by numeric values.
| Numeric Value | Permission Type |
| 0 | It indicates no permission. |
| 1 | It indicates execute(x) permission only. |
| 2 | It indicates write(w) permission only. |
| 3 | It indicates write(w) and execute(x) permissions. |
| 4 | It indicates read(r) permission only. |
| 5 | It indicates read(r) and execute(x) permissions. |
| 6 | It indicates read(r) and write(w) permissions. |
| 7 | It indicates all three permissions (read(r), write(w) and execute(x)). |
File permission:
Some examples to set or reset permission bits of the file by using numeric values are explained in the next part of this article.
Example-1: Set '- r w x r - x - w -' permission for a file
$ chmod 752 app5.py$ ls -l
The following output shows that read(r), write(r) and execute(x) permissions are set for the owner of app5.py. read(r) and execute(x) permissions are set for group users of app5.py. write(w) permission is set for the any user of app5.py.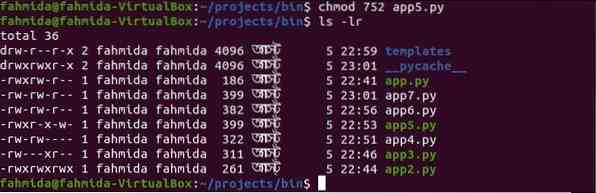
Example-2: Set '- r w x r - - - - -' permission for a file
$ chmod 740 app6.py$ ls -lr
The following output shows that read(r), write(r) and execute(x) permissions are set for the owner of app6.py. read(r) permission is set for group users of app6.py. No permission is set for the any user of app6.py.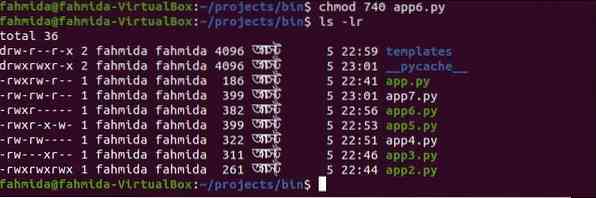
Example-3: Set '- r - - - - - - - - ' permission for a file
$ chmod 400 app5.py$ ls -lr
The following output shows that read(r) permission is set only for the owner, and the other permissions of other users are removed for the file, app5.py.
Example-4: Set '- r - - r - - r - -' permission for a file
$ chmod 444 app6.py$ ls -lr
The following output shows that read(r) permission is for all types of users, and other permissions are revoked for the file, app6.py.
Example-5: Set '- r w x r w x r w x' permission for a file
$ chmod 777 app7.py$ ls -lr
The following output shows that read(r), write(r), and execute(x) permissions are set for all types of users of app7.py.
Folder permission:
$ chmod 442 templates$ ls -lr
The following output shows that read(r) permission is set for owner and group users and write(w) permission is set for any user of the folder, templates.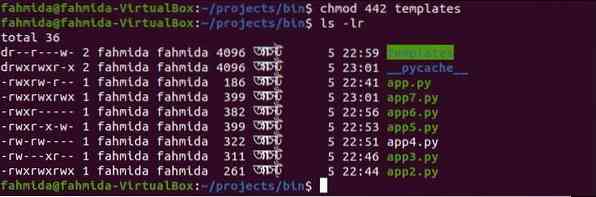
Change ownership using chown:
chown command is used to change the ownership of user and group user for any file. This command can be used in different ways to change the ownership of the users.
- When only the owner is used that is a user name or ID with this command, then the owner of the file will be changed, and the group information will remain unchanged.
- When the owner is used with a colon(:) and a group name with this command, then the ownership of both user and group users will be changed.
- When the owner is used with a colon(:) only without any group name with this command, then the ownership of the file will be changed by the owner and the group of the owner.
- When the group name is used with a colon(:) only without any owner with this command, then the ownership of the file will be changed for the group only.
- When a colon(:) is used only without any owner and group name with this command, then the ownership will remain unchanged.
Syntax:
chown [OPTION] [OWNER] [: [GROUP] ] FILE
Some options of this command are given below that can be used to change the ownership of the file.
| Option | Purpose |
| -from=CURRENT_OWNER: CURRENT_GROUP | It is used to change the owner and/or group of each file only if the current owner and/or group will match with the defined owner and group. |
| -c, -changes | It creates a report if any change is made in the ownership. |
| -f, -silent, -quiet | It will remove most of the error messages. |
| -R, -recursive | It will work on files and directories recursively. |
| -L | It will traverse every symbolic link to a directory. |
| -P | It will not traverse any symbolic links. |
| -help | It will display the help information. |
| -version | It displays version information. |
Become a superuser:
You have to become a superuser for executing the chown command. You can be a superuser for a short time by executing the following commands, but you have to know the root password for the particular command.
'su' command:
The full form of su is a substitute user, and this command can be used to get the superuser privileges to do some administrative tasks. You have to provide the root password after executing this command to get the root privilege. After executing the command, the new shell session will be created for the superuser. The session of the superuser can be terminated by typing exit command.
'sudo' command:
The alternative of su command is the sudo command. One or more users can be granted the root privilege by using this command. The current user can open the root shell-like su command by using the -i option with sudo command. exit command terminates the root shell and returns to the current user's shell.
The root user account is disabled by default on Ubuntu. So, the sudo command is used here to get the root privileges and run the chown command to set ownership of the file.
Example-1: Use of chown with the owner
$ ls -l$ sudo chown yesmin c1.py
$ ls -l
The first ls command shows the current ownership of the files that exist in the code folder. Here, fahmida is the owner of the file c1.py file before running the chown command. When the ls command is executed after running the chown command, then the ownership is given to the user, yesmin, and the group name has remained unchanged.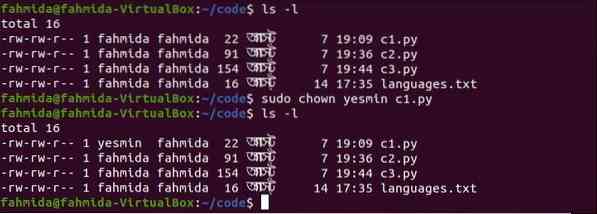
Example-2: Use of chown with the owner and colon(:)
$ ls -l$ sudo chown yesmin: c2.py
$ ls -l
The first ls command shows the current owner and group ownership of the c2.py file. Here, the user and group ownership name of c2.py is fahmida before running the chown command. When the ls command is executed after running the command, then the user ownership is given to yesmin, and the group ownership is given to the owner's group named yesmin.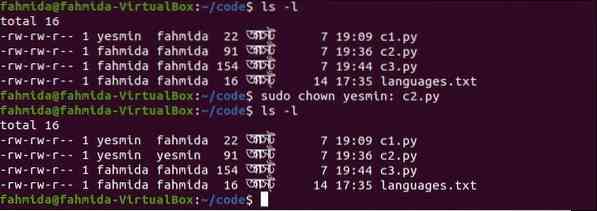
Example-3: Use of chown with the group followed by colon(:)
$ ls -l$ sudo chown :pygroup c3.py
$ ls -l
The first ls command shows the current owner and group ownership of the c3.py file. Here, the user and group ownership name of c3.py is fahmida before running the chown command. When the ls command is executed after running the command, then the group ownership is given to the owner's group named pygroup, and the user ownership name remains unchanged.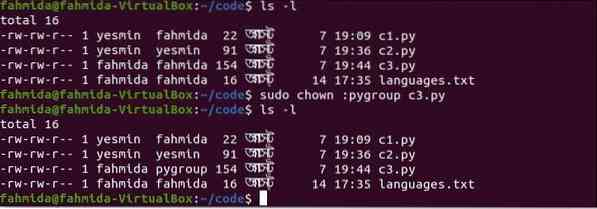
Example-4: Use of chown with the user and group followed by colon(:)
$ ls -l$ sudo chown fahmida:pygroup c2.py
$ ls -l
The first ls command shows the current owner and group ownership of the c2.py file. Here, the user and group ownership name of c2.py is yesmin before running the chown command. When the ls command is executed after running the command, then the user ownership is given to fahmida, and the group ownership is given to pygroup.
Example-5: Use of chown with a colon(:) only
$ ls -l$ sudo chown : c3.py
$ ls -l
The first ls command shows the current owner and group ownership of the c3.py file. Here, the ownership of the user is fahmida, and the ownership of the group is pygroup of c2.py before running the chown command. When the ls command is executed after running the command, then the ownership of both user and group remains unchanged.
Conclusion:
Linux users can change the file permission and ownership in multiple ways, which are shown by using different Linux commands in this article. Another command exists in Linux to change the ownership of group users only for the file. The command is chgrp that is not explained here. The task of the chgrp command can be done easily by using the chown command. I hope the concept of the file permission and ownership of the file and folder in the Linux operating system will be cleared after reading this article.


