In this post we will see how to manage, customize, rename, change, backup, restore create new Power Plans using the Command Line in Windows 10/8/7. A Power Plan is a collection of hardware and system settings that manages how computers use and conserve power. You can create custom power plans to help users configure a power plan that is optimized for their computers.
By default, Windows 10/8/7 and Windows Server include three power plans: Balanced, Power Saver, and High Performance. You can customize these plans for your systems, or create new plans that are based on the existing plans. let us see how to customize, rename, change backup and restore Power Plans using PowerCGF.
See the list of available Power Plans in Windows 10
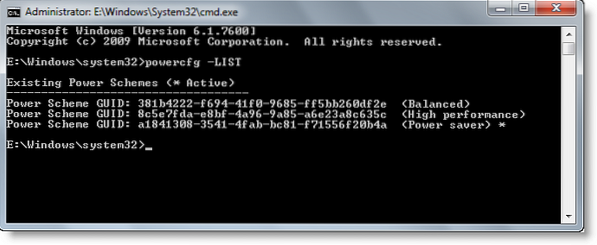
On your computer, at an elevated Command Prompt, type the following and hit Enter:
powercfg -LIST
Create a customized power plan
Click Start > Control Panel > Hardware and Sound > Power Options.
The Power Options control panel opens, and the power schemes appear.
Click Create a power plan.
Follow the on-screen instructions to create and customize a power plan based on an existing plan.
Read: How to delete a Power Plan in Windows 10.
Capture, export or backup power plans
After you have created power plans that work for your system, capture the power plans from your technician computer, and deploy them to your destination computers. For example, to export a power plan from your technician computer called OutdoorScheme, type the following and hit Enter:
powercfg -EXPORT C:\OutdoorScheme.pow guidScheme-New
Deploy, import or restore power plans
To import a power plan called OutdoorScheme, open an elevated command prompt, and type:
powercfg -IMPORT C:\OutdoorScheme.pow
Set a power scheme to be the active power plan
Type the following and hit Enter. For example:
powercfg -SETACTIVE guidScheme-New
To activate the Power Saver plan, use:
powercfg.exe /setactive a1841308-3541-4fab-bc81-f71556f20b4a
To activate the Balanced plan, use:
powercfg.exe /setactive 381b4222-f694-41f0-9685-ff5bb260df2e
To activate the High-Performance plan, use:
powercfg.exe /setactive 8c5e7fda-e8bf-4a96-9a85-a6e23a8c635c
Restore default Power Plan schemes
Use this command:
powercfg -restoredefaultschemes
Restore individual Power Plans
High Performance:
powercfg -duplicatescheme 8c5e7fda-e8bf-4a96-9a85-a6e23a8c635c
Balanced:
powercfg -duplicatescheme 381b4222-f694-41f0-9685-ff5bb260df2e
Power saver:
powercfg -duplicatescheme a1841308-3541-4fab-bc81-f71556f20b4a
Read: Power Plan keeps changing in Windows 10.
Rename a Power Option
Use the following switch in an elevated command prompt:
Powercfg -Changename GUID name [scheme_description]
This will modify the name of a power scheme and, optionally, the scheme description.
Usage:
powercfg-changename GUID namescheme_description
- GUID: Specifies the GUID of the power scheme
- Name: Specifies the name of the power scheme.
- scheme_description: Describes the power scheme.
If the description is omitted, then only the name will be changed.
To learn more about such additional Powercfg Command-Line Options, visit Technet. For a detailed read and more information please visit Technet Libraries.
Read next: How to enable Ultimate Performance Power Plan in Windows 10.
These posts may also interest you:
- How to Change Power Plan Settings & Options using the Control Panel.
- Pro's and con's of the different Power Plans
- How to troubleshoot Power Plans.


