In this article, you'll see how you can make use of your Raspberry Pi in headless mode using Ubuntu. By headless mode, it means that the Raspberry Pi is running without a monitor keyboard and a mouse.
You'll be making use of a WiFi connection, so you should get one setup as you'll need it in the later parts of this article.
Using the Raspberry Pi
Since the Raspberry Pi is a microcomputer, it can actually work like a computer does despite doing so with limited resources. One way to use it is to connect it to a monitor, keyboard and mouse.
Not everybody has access to the accessories, so alternatives are sought. Running the Raspberry Pi is a well-known alternative, as you can make use of the Pi through another computer, where a monitor, keyboard and mouse are available.
Getting an Operating System
Hardware is nothing without software. Your Raspberry Pi is no useful than a piece of paper without having software on it. You need software working on it-in this case an operating system-to get anything done.
You can download the Raspbian OS and write the image to the SD Card you intend using for the Raspberry Pi. Doing this is beyond the scope of this article, but you can use a USB SD Card reader and follow the steps taken to create a bootable USB.
Enabling SSH on the Pi
SSH should be active on the Raspberry Pi since that's the method you intend using to run the device in headless mode. Unfortunately, this utility doesn't come enabled by default on the Pi so you'll need to enable it yourself.
After writing the image to the sd card, you need to create an empty file in the boot directory of the SD Card. The file should be named ssh, without any extension. You can do this in the terminal by using the touch command in that partition.
touch sshWhen you get to use the Raspberry Pi, it checks for this file. It sees it, then enables SSH and deletes the file.
Setting Up the WiFi
To use the Raspberry Pi in headless mode, you can make use of an Ethernet connection. But in this case, you'll see how to set it up using a WiFi connection.
For this to work, you computer has to be connection to a WiFi-the WiFi source doesn't need to have internet access.
Just like you added an ssh file to the boot directory of the SD Card, you'll add a file called wpa_supplicant.conf to the root folder of the same directory.
Simply copy the following content into the file:
ctrl_interface=DIR=/var/run/wpa_supplicant GROUP=netdevupdate_config=1
country="your_ISO-3166-1_two-letter_country_code"
network=
ssid=""your_SSID""
psk=""your_PSK""
key_mgmt=WPA-PSK
You'll replace <
Fetching the IP Address
To SSH into the Raspberry Pi, you need to know its IP address. In this section, you'll see how to do that.
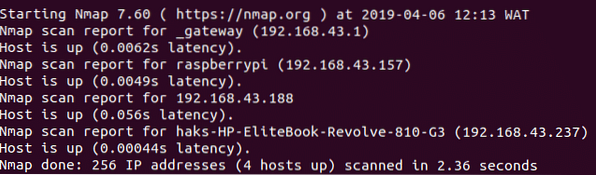
You need to have the nmap tool installed on your machine to be able to follow up with this part of the tutorial. If you do not already have it installed, you can quickly do that using:
sudo apt-get install nmapNmap is a security network scanner that will help you scan for the Raspberry Pi's IP address. After installing Nmap, find your computer's IP address by using the hostname command.
Simply type into the terminal:
hostname -IThis command is used to check for all the IP addresses available on the host. You'll get a result similar to 192.168.x.x which is the IP address of the WiFi.
To find the specific IP address for the Raspberry Pi, type in the following command:
nmap -sP 192.168.x.0/24Replace x with the actual value you can see on your machine after running the hostname -I command.
You'll see that there are a couple of IP addresses showing up. The IP addresses should have a name, so it's easy to figure which of the addresses belong to the Raspberry Pi.
Accessing the Pi
Now that you know the ip address, you can use it to access the Raspberry Pi through SSH. The default username for the Raspberry Pi is pi and the default password is raspberry.
Now that this is known, you can ssh into it with the command below:
ssh pi@piaddressReplace the piaddress with the actual IP address of the Raspberry Pi and you should be in the Raspberry Pi.
Remember the default password is a generic one, so you need to change it. The Raspbian OS is a Debian based Linux distro, so you can perform similar tasks on it like you would on a regular Linux distro like the Ubuntu.
As an example, you can change the default password by simply typing in the passwd command into the terminal.
You'll receive a prompt requesting you to type in your current password and then the new password.
Accessing the Pi's Graphical User Interface
You are accessing the Pi through SSH so you are only able to use it through the terminal. But you can't do much with it from just the terminal, so you'll need to gain access to the GUI for a more fulfilling experience.
To do this, you need to use a tool called RealVNC. Note that you'll be installing RealVNC inside the Raspberry Pi and not your Ubuntu machine.
Therefore, ensure that you have [email protected] showing on your terminal prompt by SSH-ing into the Pi.
Before installing, update the package repository list using:
sudo apt-get updateThen you can install with the command below:
sudo apt-get install -y realvnc-vnc-server realvnc-vnc-viewerNow that RealVNC has been installed on the Raspbian, you can fetch the IP address it uses to connect to your Ubuntu server.
To do that, type in the command below:
vncserverYou'll get an IP address which should be noted or copied somewhere as you'll need it soon.
Since RealVNC on the Raspberry Pi needs to work with the Ubuntu machine through an IP address, you need to also have it installed on your Ubuntu machine.
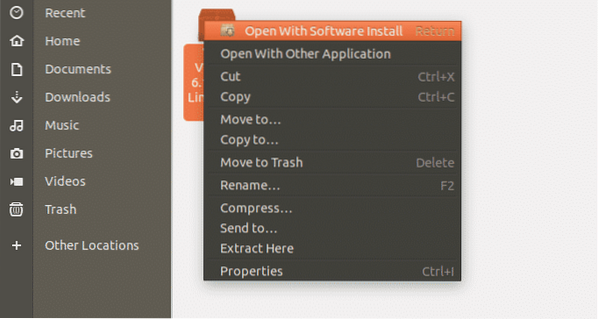
You can download RealVNC for Ubuntu here and it's a deb file. You can install it through the terminal or using the “Software Install” package on Ubuntu.
After the install, you'll find the icon of the VNC Viewer on your application list. Click on the “File” menu and the “New Connection” option.
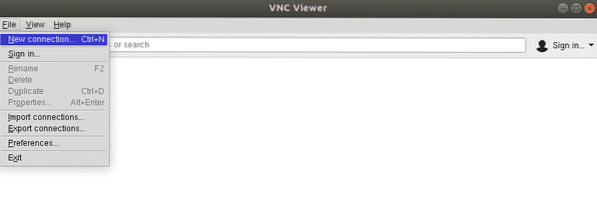
You'll find a box to input the IP address you copied a while ago, and you can also give a name to it. Click “OK” to save.
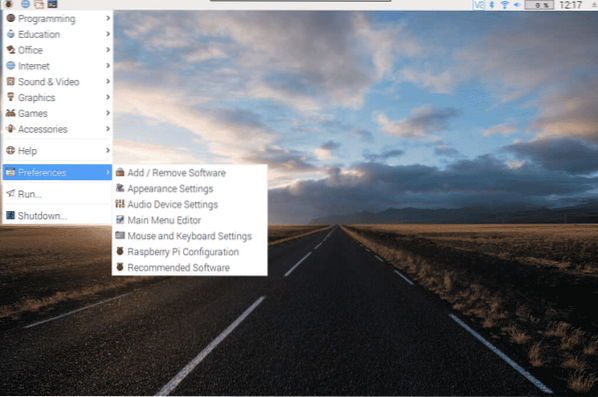
Now you can right click on the newly created option and connect to it. There you have it, the GUI of the Raspberry Pi should display on your screen.
Conclusion
After following the various points of this article, your Raspberry Pi should be accessible on your computer, through the terminal and the Graphical User Interface (GUI).
In this article, a step-by-step approach has been taken to setting up Raspberry Pi to run headless on the Ubuntu machine. Tools such as Nmap, RealVNC are important in this process, and the Pi can now be used by “SSH-ing” into the Raspberry Pi through a WiFi connection.
You shouldn't have any hiccups while going this route, but if you do; kindly ask questions. It's time to get started with amazing projects.


