Here, /dev/sdb1 is set to mount at the path /storage/disk2p1. This is alright and it works. But there is a problem. /dev/sdb1 is the first partition of the second hard drive of your computer. Similarly, /dev/sda1 is the first partition of the first hard drive. There is no guarantee that /dev/sdb1 will always be /dev/sdb1. Depending on the order of how you connected the hard drives to your motherboard, it may change. If that happens, your hard drives may be mounted in the wrong mount points resulting data loss or data corruption.
To solve this, we can use UUID or LABEL. UUID is a better choice as it is unique throughout the system. Even if it's different computer system, the probability of duplicate UUID is almost zero.
LABEL on the other hand is a short name that you can put it when you format a partition to identify the disk. Many people can use the same LABEL. So, the uniqueness of LABEL depends on how creative you are at naming your partitions.
In this article, I will show you how to mount partitions using UUID and LABEL using the /etc/fstab file on Linux. So, let's get started.
Finding the UUID and LABEL of Partitions:
There are a couple of ways to find the UUID and LABEL of a partition. In this section, I will show you some of them.
You can find the UUID and LABEL of all the partitions from the command line as follows:
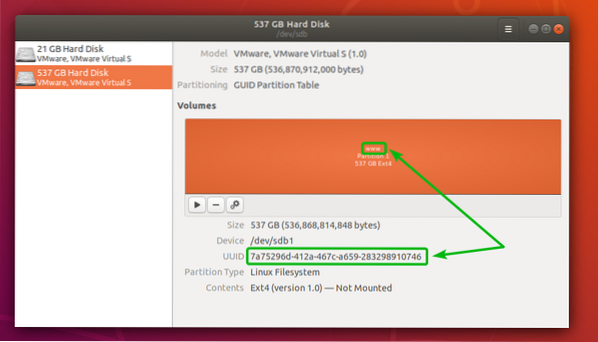
$ sudo blkid | grep -v loopAs you can see, the LABEL and UUID of all the partitions in your system is listed. There is one more parameter that you will need in order to mount a partition, the filesystem TYPE. For example, /dev/sdb1 in my case has the LABEL www, UUUID 7a75296d-412a-467c-a659-283298910746 and TYPE (filesystem type) ext4.

You can also find the UUID and LABEL of a partition from GNOME Disk Utility as you can see in the screenshot below.
Mounting Partitions Using UUID:
In this section, I am going to show you how to permanently mount partitions using UUIDs.
First, find the UUID of the partition that you want to mount using one of the methods stated above.
Let's say, you want to mount the partition /dev/sdb1 using it's UUID 7a75296d-412a-467c-a659-283298910746 to the path /var/www.
Then, make a new directory (in my case /var/www) where you want to mount the partition if it does not exist already with the following command:
$ sudo mkdir /var/www
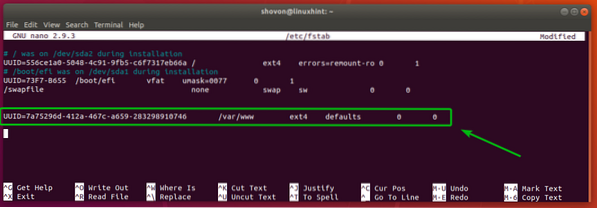
Now, open the /etc/fstab configuration file with your favorite text editor. I am going to use nano.
$ sudo nano /etc/fstab
Now, add the following line at the end of the file.
UUID=7a75296d-412a-467c-a659-283298910746 /var/www ext4 defaults 0 0NOTE: Replace the 7a75296d-412a-467c-a659-283298910746 with the UUID of your partition, /var/www with the directory path where you want to mount the partition and ext4 with the filesystem type if yours is not of the type ext4.
Now, press
Finally, restart your computer with the following command:
$ sudo reboot
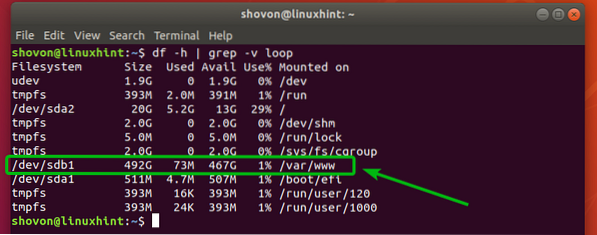
Once your computer starts, check whether the partition is mounted correctly with the following command:
$ df -h | grep -v loopHere, you can see /dev/sdb1 is mounted in /var/www. So, it worked.
Mounting Partitions Using LABEL:
In this section, I am going to show you how to mount partitions permanently using partition LABEL.
Here, I have a partition /dev/sdc1 with the LABEL Data.

Let's say, I want to mount /dev/sdc1 using the LABEL Data in the directory path /data.
To do that, first, make sure the directory path /data exists. If it does not, create it with the following command:
$ sudo mkdir /data
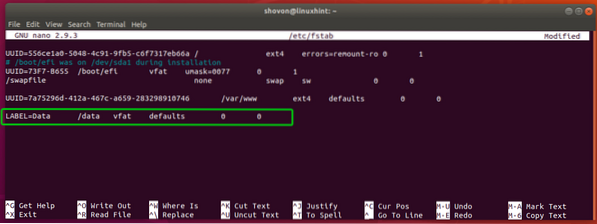
Now, open the /etc/fstab configuration file with your favorite text editor. Again, I am going to use nano.
$ sudo nano /etc/fstab
Now, add the following line at the end of the file.
LABEL=Data /data vfat defaults 0 0NOTE: Replace Data with the LABEL of your partition, /data with the directory path where you want to mount the partition and vfat with the filesystem type if yours is not of the type vfat.'
Now, press
Finally, restart your computer with the following command:
$ sudo reboot
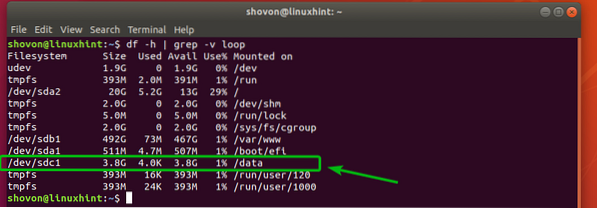
Once your computer starts, check whether the partition is mounted correctly with the following command:
$ df -h | grep -v loopAs you can see /dev/sdc1 is mounted in the directory path /data. Great!
So, that's how you mount partitions using UUID and LABEL. Thanks for reading this article.

